


Carter's Zone / Photoshop / Coloring Lineart
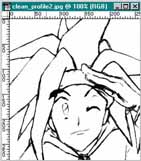
- Once the lineart is scanned and cleaned you should have a nice black and white image.
- Click on your 'channels' window and drag the Blue channel onto the 'New Channel' icon beneath it. This makes a 4th channel called "ALPHA 1".
It should look exactly like the other 3 channels. Now, invert this channel by pressing "Ctrl-I". The image should now be negative.
- Go back to the 'Layers' window and create 2 new layers by licking the "New Layer" icon twice.
- Name the top layer "Lineart" and the middle layer "Color". Then, clear the background layer by filling it with white.
- Click on the ALPHA 1 channel to make it active, right-click the image and select "Load Selection" and press okay. Now click the Lineart layer to make it active.
- You will see a "arching ant" selection of your lineart. Fill it with black.
- You now have the black lineart on top. This is good because you can now color the picture without screwing it up, just always be careful of what layer you have selected.

Hunter by Matthew Carter
Tutorial by Matthew Carter
E-mail me
- Once the lineart is scanned and cleaned you should have a nice black and white image.
- Click on your 'channels' window and drag the Blue channel onto the 'New Channel' icon beneath it. This makes a 4th channel called "ALPHA 1". It should look exactly like the other 3 channels. Now, invert this channel by pressing "Ctrl-I". The image should now be negative.
- Go back to the 'Layers' window and create 2 new layers by licking the "New Layer" icon twice.
- Name the top layer "Lineart" and the middle layer "Color". Then, clear the background layer by filling it with white.
- Click on the ALPHA 1 channel to make it active, right-click the image and select "Load Selection" and press okay. Now click the Lineart layer to make it active.
- You will see a "arching ant" selection of your lineart. Fill it with black.
- You now have the black lineart on top. This is good because you can now color the picture without screwing it up, just always be careful of what layer you have selected.