


Carter's Zone / Photoshop / Coloring Lineart (Page 2)

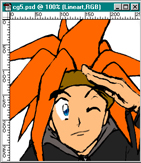
- All neatly colored without any sort of shading or special effects, that comes later. For now, just keep it simple.
- Make the 'Color' layer active by clicking on it.
- Use the 'Polygon Lasso' tool to select areas to color. For example, here I've selected Hunters hair to be red, shirt to be black, etc.
- Only fill the selections with flat colors. No special shading or special effects yet.
- Make sure to make an colors touching each other to be dissimilar. For example with this picture, I wouldn't color the shirt and the hood in two different shades of yellow, instead color one blue or something. I'll get to the reason soon.
- After you've colored the entire picture in flat, non-shaded colors. Select the entire color layer (Ctrl-A) and copy (Ctrl-C).
- Go to your 'Channels" window. Create a new channel (Alpha 2) and fill it with WHITE. -Paste this color layer into this channel (Ctrl-V). Rename the channel "FLATS".
- Notice this channel is all grayscale. Channels don't contain colors. That's why 2 similar colors together might turn into the same shade of gray which could cause potential problems.
- "So what the hell was the point of that!?" I'll tell you! Now you can add stuff to the color layer to your heart's content... but what if you're a screw up? Normally you'd have to do a lot of fooling around to fix your messed up area and
recolor it. But with the 'FLATS' channel you already have a perfect selection of each of the individual color areas. Just use the 'Magic Wand' tool, click the area, Reactive the color layer and fill it back in to start with a clean slate, so to speak. Cool, huh?


Hunter by Matthew Carter
Tutorial by Matthew Carter
E-mail me
- All neatly colored without any sort of shading or special effects, that comes later. For now, just keep it simple.
- Make the 'Color' layer active by clicking on it.
- Use the 'Polygon Lasso' tool to select areas to color. For example, here I've selected Hunters hair to be red, shirt to be black, etc.
- Only fill the selections with flat colors. No special shading or special effects yet.
- Make sure to make an colors touching each other to be dissimilar. For example with this picture, I wouldn't color the shirt and the hood in two different shades of yellow, instead color one blue or something. I'll get to the reason soon.
- After you've colored the entire picture in flat, non-shaded colors. Select the entire color layer (Ctrl-A) and copy (Ctrl-C).
- Go to your 'Channels" window. Create a new channel (Alpha 2) and fill it with WHITE. -Paste this color layer into this channel (Ctrl-V). Rename the channel "FLATS".
- Notice this channel is all grayscale. Channels don't contain colors. That's why 2 similar colors together might turn into the same shade of gray which could cause potential problems.
- "So what the hell was the point of that!?" I'll tell you! Now you can add stuff to the color layer to your heart's content... but what if you're a screw up? Normally you'd have to do a lot of fooling around to fix your messed up area and recolor it. But with the 'FLATS' channel you already have a perfect selection of each of the individual color areas. Just use the 'Magic Wand' tool, click the area, Reactive the color layer and fill it back in to start with a clean slate, so to speak. Cool, huh?